


Be honest - you fell in love with our adorable little mushrooms from the Forest Story feature table at market, and you’re dying to make your own. These toadstools can be made in a variety of colors and add the perfect bit of whimsy to any table, especially when paired with products like the Oak Leaf & Antler Crest Placemat and the Thankful Runner. You could also try pairing them with our wood logs for an adorable nature-inspired decoration!
If you’re a crafter looking for a bit of a challenge, you’re in luck, because below is a tutorial to create your very own mushroom magic!

Getting Started
This is a craft that will take patience and precision, and is not for the faint of heart. If you are ready to tackle an advanced craft, then keep reading!
Begin by making sure you have a space cleared for crafting. There are lots of little pieces involved, so you’re gonna need mush-room to spread out!
Gather your materials:
Crepe paper
Honeycomb paper
Floral or craft wire
Drinking straws (for stems)
Scissors
Glue
Pencil
OPTIONAL: chalk pastels and a fluffy brush (like a powder brush for blushing)

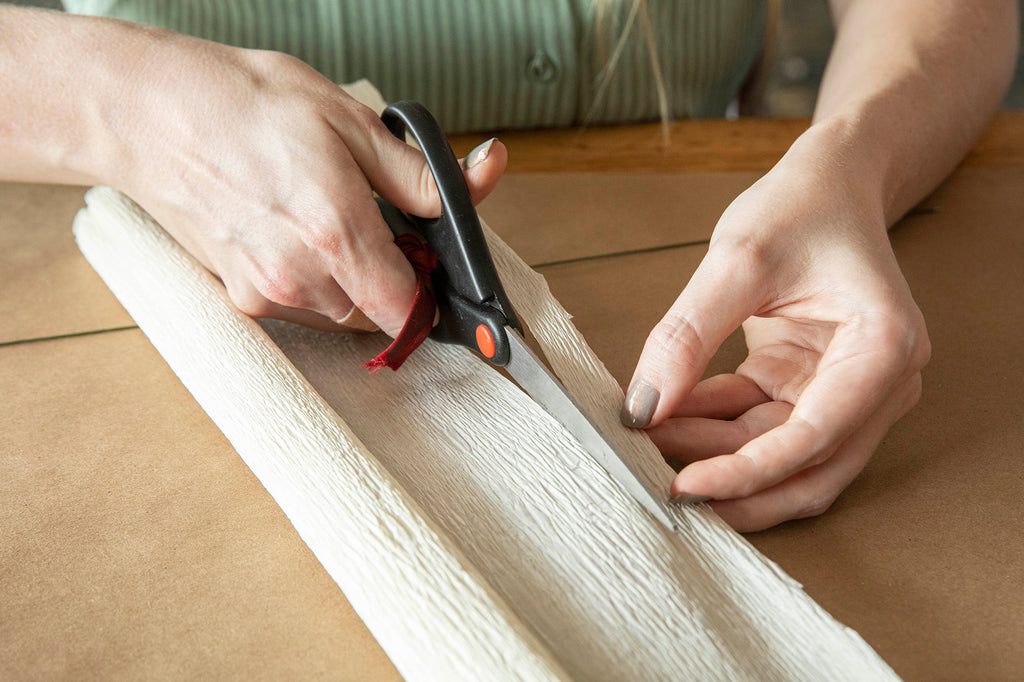
1. Select the crepe paper you want to use for your mushroom cap. Cut a small rectangle. The measurements will vary depending on how small or large you would like your mushroom to be, though we recommend starting off with a slightly larger mushroom measuring approximately 3”x5”. Make sure to cut so that the grain of the paper is vertical. Once you have cut your rectangle, fold it over at the bottom approximately 1 cm. As you are folding, gently stretch the bottom edge of the crepe. Now, with the “hem” facing inward, join the short ends of your crepe rectangle into a tube shape, tucking one side into the other and glueing together.

2. This next part takes some practice! Pinch the top (the side without the folded edge) of your “tube” together and glue. Now, turn your cap inside-out. Holding the gathered point, fold the top over to make an umbrella shape. Add a tiny amount of glue to the hole in the center and pinch together, making sure that the glue does not show on the top of the mushroom cap. Shape the crepe with your hands, twisting and molding as you go, until you are happy with the look of your cap.


3. Now, onto the gills--these are the delicate structures on the underside of many varieties of mushroom that give them a distinctive look. To create the gills, grab a sheet of honeycomb paper. You will be cutting small wedge shapes out of this paper--to ensure that the gills and the cap will fit together properly, make sure that the longest side of your wedge shape is approximately the radius (the length from the center to the outside edge) of your mushroom cap. Cut two of these shapes at an angle, facing the same direction. We recommend cutting one wedge out, then tracing it to make sure they will match perfectly.


4. Glue the wedge shapes together. It is important to note how the pattern looks on the inside, so be sure to gently pull apart your honeycomb wedges and check. Make sure that the “diamond” shapes line up together and go in the same direction. After glueing one side together, when you pull the paper apart, it should fan out like an accordion. Bring the remaining sides together and glue them to form a paper ball.


5. Open your honeycomb paper ball gently from the top. These are your completed mushroom gills! Glue them to the underside of your cap.


6. Finally, time for the stem. Don’t worry, this part is easy!
Cut a long, narrow strip of crepe paper--once again, the grain of the paper should be vertical. Choose your stem base. Drinking straws work well for a thicker, sturdier stem, while wire works well for a more delicate and posable stem. Glue the end of the strip to the top of your stem base and wrap to cover completely. Attach to your mushroom cap with a dab of glue and voila! A fungi fit for the forest floor!


*** Bonus step: break out your chalk pastels and a soft powder brush to give your mushrooms a gentle blushing. Rub chalk pastels on a piece of paper, then transfer the excess pigment powder to the top of your mushroom cap with the brush. Watch your mushrooms come to life!


Check out our printable quick guide for easy-to-follow illustrated steps!
1 comment
love it but where do you get honey comb paper from I can not find it anywhere….